Showing posts with label Resources. Show all posts

Thursday, July 23, 2009

Displaying links to "related posts" beneath individual entries on our blogs is a tried and trusted method of providing useful and interesting reading material for our readers.


I've written about several different methods which Blogger users can choose to display related posts - all of which perform their function well enough. But after seeing several of my favourite sites displaying links to related items with thumbnails using LinkWithin's free service, I was intrigued to discover how well this may be adapted for use with Blogger.


About LinkWithin

LinkWithin is a free service offered by a small team based in New York. This free service enables us to display related posts with thumbnails below our blog posts (the thumbnail is taken from an image within the post it links to).

We retrieve and index all stories from your blog archive, not just recent stories, making them accessible to new or casual readers of your blog who would not otherwise encounter them.
The posts chosen to appear as related posts are based on several factors including:

  • Relevance

  • Popularity

  • Recency

At present, LinkWithin is not ad-supported and is completely free to use.  As explained on the FAQ page:

We plan to introduce revenue-sharing features in the future, but they will be optional.
At present, there is little documentation for us to be certain of these factors, though after testing LinkWithin in a few different sites, I'm pretty impressed by the choices generated for each post!


Here is an example of how LinkWithin functions for WeLoveBlogger.com:


Why LinkWithin may be a more ideal solution than other related posts solutions for Blogger

The "related posts" solutions for Blogger which I've used until now have all relied on label feeds. That is, the recent posts generated by such scripts collect recent posts from the same label (category). This often means that posts deeper within our archives are generally ignored, even when they may be far more relevant than the more recent posts displayed.


LinkWithin parses all posts from our blogs, and chooses the posts to be displayed using more complex and relevant factors. This ensures far greater relevancy which is better for our readers and also ensures that older posts are included in the display.

How to add LinkWithin Related Posts to Your Blogger Blog

If you're using a standard, uncustomized Blogger template, the method for installing LinkWithin is fairly straightforward. Simply visit the LinkWithin website, fill in the form on the right-hand side (choosing Blogger as your platform) and follow the instructions provided.


This will install the related posts in your template as a gadget beneath the main posts section, though you'll find the "You may like these related stories" section will be displayed beneath each of your blog posts (before the post-footer section). It will also display on each and every page of your blog, including the main, archive and search pages.

Custom Installation of LinkWithin for Blogger templates

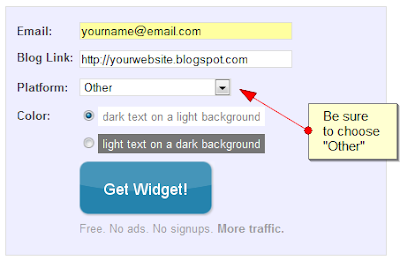
If you prefer to display your related posts only on item pages or have a customized, non-standard Blogger template, here is how you can install LinkWithin:

  1. Visit the LinkWithin website and fill in the form on the right-hand side. For the "platform" be sure to choose "Other":


  2. On the next page, you will find a script like this is generated. From this code, you need to write down your unique "site ID" for later use (or copy this to your favourite text editor):


  3. Once you have a note of your Site ID, go to Layout>Edit HTML in your Blogger dashboard and ensure you have checked the "Expand widget templates" box.

  4. Using your browser's search function, locate this tag (or similar) in your Blogger template code: <div class='post-footer'>


    Depending on the template you are using, this tag may vary slightly though you should usually be able to locate 'post-footer' in your template code.

  5. Immediately before this line, paste the following section of code, replacing "YOUR_SITE_ID" with the ID number you have noted down for your site:


    <b:if cond='data:blog.pageType == "item"'>

    <script>

    var linkwithin_site_id = YOUR_SITE_ID;

    (function () {

    var elem = document.createElement('script');

    elem.type = 'text/javascript';

    elem.src = 'http://www.linkwithin.com/widget.js?rand=' + Math.random();

    document.getElementsByTagName('head')[0].appendChild(elem);

    })();

    </script>

    <a href="http://www.linkwithin.com/"><img src="http://www.linkwithin.com/pixel.png" alt="Blog Widget by LinkWithin" style="border: 0" /></a>

    </b:if>

  6. Preview the changes you have made before saving your template. The LinkWithin gadget should not display in the preview; furthermore, if there are any errors in the installation you will be able to see before attempting to save.

  7. If all is well, save your template and visit an item page in your blog: you should be able to see related posts showing up beneath your blog posts.

Support for LinkWithin's related posts

While I can help with installation for LinkWithin in Blogger templates, I'm not able to help with specific problems with the script.


Luckily, the LinkWithin team offer a good support service via email:

If your blog uses a non-standard custom template/theme, we will need to add support for your blog manually, and we can do this only if the widget remains installed on your blog. Please email us at support AT linkwithin DOT com, and we will fix the problem, usually within 1-2 days. Thank you for your patience!
At the moment, it appears we can only display three related posts. Hopefully LinkWithin will offer the option to display more (or less) items in a future version of the script.


Why I'm not using LinkWithin yet...

LinkWithin is a very useful solution for Blogger users wishing to display links to related posts in their blog. I recommend this service and will be using this in a future release of Blogger Buster.


My current template is highly complex and has served me well for many months. However, there are several new (and upcoming) customizations and new features for Blogger which may not work so well in this design. I'll explain more about this in a future post when the site changes are closer to completion.


Are you using LinkWithin? What do you think about this service?

If you're already using LinkWithin (or plan to use this soon), please let us know your opinions of this free service, and how well you think this adapts to displaying posts in your blog by leaving your comments below.


Thursday, April 30, 2009

Some time ago, I was able to preview Susan Gunelius' new book, Google Blogger for Dummies, which is now available to buy from your local bookstore. After receiving my own copy, I've spent the past few weeks reading intently in order to provide you all with my full review of this "Dummies" guide.

Blogger for Dummies?

The "For Dummies" series of reference books published by Wiley are complete guides on a range of subjects which present information in plain English. "Dummies" books are offered as complete guides on the given subject, where the information presented makes the subject easy to understand even for a complete beginner.


In Google Blogger for Dummies, Susan Gunelius offers a simple and comprehensive approach for understanding and making the most of the Google Blogger platform. Chapters range from "Setting up your blog" right through to "Making Money With Blogger" and "Boosting your Search Engine Ranking". This ensures that readers learn far more than how to use Blogger to publish our blogs: we can learn how to use Blogger to create an authoritative, income-generating and professional blog on the niche project of our choice.


What's covered in the book

Google Blogger for Dummies is split into six main parts, with each part containing several chapters which comprehensively detail an aspect of blogging with Blogger. Furthermore, each chapter is segmented further into mini-sections (usually no more than a page long) which offers detail, advice and information on the aspects of blogging you may encounter.


Part I: Introducing Google Blogger

This section offers a complete overview of Blogger and blogging in general, which is especially useful for those who are creating a blog for the first time.


By covering in brief the aspects of using Blogger which are detailed more fully in later chapters, Susan creates an excitement about choosing Blogger and anticipation of Blogger's effectiveness as a powerful blogging tool.


Part II: Using Google Blogger

In this section, we are presented with detailed instructions for creating and maintaining a Blogger blog, including how to initially create a blog; how to manage archives; comments and backlinks; writing blog posts; enhancing the appearance with templates, and using gadgets/widgets in the layout.


Each chapter is enhanced by screen-shots and useful tips to ensure we can easily follow the instructions and advice given. I especially enjoyed reading Susan's advice about choosing which subjects to write about, and issues of copyright/fair usage. Such considerations are often misunderstood (or even overlooked) by those who are new to blogging, and her expert advice shines light on what is otherwise a cloudy issue.


Part III: Making Money with Blogger

As pointed out in Google Blogger for Dummies, many people choose to start a blog in order to earn money from it. By devoting an entire part of this book to the subject of making money, Susan understands the needs of many Blogger users (both newly initiated and seasoned bloggers) and offers information most relevant for those using the Google platform as their publishing tool.


In this part, we can learn about the many different types of advertising we can add to our blogs to generate an income, including text links, paid posts, contextual ads, and of course Google Adsense.


Part IV: Growing your Audience

This section of the book offers practical, useful advice for growing the audience of our Blogger blogs which is presented and explained in a very "down to earth" manner.


Most bloggers are concerned with growing their blog's audience and increasing their authority in search engine rankings. I'm often asked about this aspect of blogging by Blogger Buster readers, but since this is something I've learned through a combination of gradual experience and "trial and error", it is not something I am expressly confident in explaining.


Susan's explanations are very clear and easy to understand. She explains the nature of relationship building for bloggers, how to network with other online writers and particularly how to optimize our blogs for search engine rankings. Advice to help track blog statistics, effective linking and keyword analysis are also included which I feel is a boon to new bloggers who may have little understanding of what these buzzwords mean.


Part V: Extending your Blog

This section offers details for growing and downsizing our blogs. By "growing", Susan refers to adding team members, writing for other's team blogs and creating a new blog linked to our blogger profiles. "Downsizing" refers to the practise of deleting a blog we no longer wish to own.


In this section, we can also find details of blogging with different media (such as email posts, video blogging and posting via a mobile phone). Custom domains and FTP blogging are also discussed for the benefit of those who prefer to associate their blogs with their own domain name.


Part VI: The Part of Tens

In all "Dummies" guides, the "Part of tens" is used at the end of the book to reference key points or resources appropriate for the particular subject of the book.


In Google Blogger for Dummies, the Part of Tens includes:

  • Ten useful social networking and social bookmarking sites

  • Ten common Blogger problems and possible solutuins

  • Ten places to find free Blogger themes and templates

The "Blogger problems" section was the one I found particularly useful as it covers problems which Blogger Buster readers have contacted me about with regularity. These issues are explained in detail, along with problem-solving solutions and ideas for prevention so these issues do not occur again.


Excellent Presentation

One of the reasons I am a fan of Dummies books in general is the overall presentation of these guides which enables readers to locate the information they require with ease and literally "dip in" at any stage to find useful tips or references.


The front cover is bold and unmistakably part of the Dummies series with a bold yellow background. Key points of the book's content are presented on both the front and back covers, along with a brief biography of Susan Gunelius - a professional blogger in her own right with expert status in marketing and branding.


A key aspect of presentation which I find useful in any technical guide is the use of headings and points to break up text, and appropriate hints relevant to the main content at key points. In this respect, Google Blogger for Dummies comes up trumps: the content is very well organised making it easy to follow; icons refer to tips, warnings and technical areas of the content, while highlighted text boxes enhance basic instructional sections with advice based on Susan's professional experience on a given subject.


The contents section actually comes in two segments: the first offers a brief overview of the parts and chapters, while the second is a comprehensive guide to include all major sub-headings (the individual topics) which are covered in the guide.


Near the end of the book is a comprehensive glossary which provides easy referral for key terms associated with both Blogger and blogging in general. Finally, a complete index offers a means of easily locating any terms or subjects with which we need particular guidance.


Unfortunately the screen-shots in Google Blogger for Dummies are in black and white, rather than full colour. Having read other Dummies guides before, I had not expected colour images; however, colour in some sections (such as when discussing templates and layouts) would have been more beneficial for readers of this guide to offer a more complete analysis of the sections being discussed.


So is it a complete guide to Blogger?

Almost, but not quite. The range of subjects discussed is very comprehensive in Google Blogger for Dummies and Susan Gunelius' expertise in blogging offers a highly comprehensive guide for building and maintaining a successful blog. However, there are a few small areas which I feel could be further enhanced, particularly as many readers of this guide will have little or no experience using the Blogger platform.


For example, in Chapter 16 when explaining how to purchase a domain from a third party, more information regarding changing the DNS settings would have been much appreciated. This aspect of using Blogger is often difficult to navigate, and while I understand that the process does differ between domain providers, an overview explaining key terms or a link to Blogger's help pages on this subject would lift the fog and enable new bloggers to manage this important aspect of Blogger much more easily.


I'm also concerned that the subject of editing the Blogger template is virtually skimmed over in this guide. Although the Layout>Edit HTML tab is briefly mentioned as a menu item and is referred to in the process of uploading third party templates, no explanation of how to manually edit the Blogger template is given. This may be a personal opinion, since editing templates is a key aspect of my experience with using Blogger; however, I'm sure that many readers of this book would have appreciated at least some advice, if only an overview of how Blogger template files are coded combined with HTML/CSS resources where more could be gleaned on this complicated subject.


In summary...

After having read most of the books available about the Google Blogger platform, I can honestly attest that Google Blogger for Dummies is the best and most comprehensive guide available. Rather than simply explain how to use Blogger, this book offers a complete guide to building a successful blog with Blogger, an interesting and wholly useful standard which few other books about blogging platforms have adopted.


I do certainly recommend Google Blogger for Dummies, particularly for those who are new to blogging or who have recently decided to use Blogger as their publishing platform. While certain advanced aspects of working with Blogger could be enhanced, the basics are all included, enabling even a complete novice to build, manage and maintain their blog using this easy to follow guide.


Google Blogger for Dummies is currently available from Amazon, Barnes and Noble and other online bookstores for around $16.49.

Monday, February 2, 2009

Adding Google Maps integration to your web projects can offer visitors a more interactive experience of your website and assist the understanding of where events or business takes place.


In a recent project, I decided to utilize Blogger to create a website for a local business, and found that including Google Maps was of great benefit for visitors to understand where the business is located. However, of the many tutorials on the web which explain how to add Google Map functionality to our websites, I was unable to find clear instructions for how maps can be added to a Blogger powered blog.


Luckily I discovered two simple and highly useful techniques for adding Google Maps to blog posts with no editing of the template required.


In this post, I'll explain just how easy it is to add interactive Google Maps to your blog posts, which can offer your readers further insight into events, business or other local information which are relative to your site or blog posts.


An Overview of Google Maps and Blogger

Bloggers write for many different reasons: some to log their daily activities or keep in touch with friends and family; others to publicize their business, or earn an income online by providing useful and informative articles.


No matter what the genre of our subject matter, there may well be times when area maps relevant to our posts may enhance the experience for our readers. A family blogger for example could illustrate their holiday destination, while a business blog could demonstrate the location of their shops.


While Blogger's recent "Geotagging" feature proves useful to many Bloggers, there are times when nothing less than an actual map will do. And when you consider the interactivity offered by Google Maps (2d maps, sattelite views and even driving directions), the prospect of adding such a feature to our blogs becomes even more enticing!


Here, for example, is a map of Downing Street in London, England:


View Larger Map


Using this map, you can easily switch between the 2-dimensional map, a satellite view and even the terrain of the ares. You can move the map in any direction to see the surrounding area; zoom in and out for a closer/distant view, and incredibly you can link to driving directions too!


Such interactive elements can add a huge amount of interest to your posts, and can assist reader's interaction with your site, whether this be a deeper understanding of the locations you write about, or to help potential customers find out where your business is based.


There are two main methods you could use to add customizable Google Maps to your blog posts:

Neither of these options requires you to edit your Blogger template in order to add these maps to your posts (or even your sidebar, if you prefer this location). Whats more, these can be added simply by copying and pasting a section of code to your posts.


Let's go through each of these methods in turn and explain the circumstances in which these would be most useful.


Adding an Iframe generated by Google Maps

I personally find this to be the easiest and most reliable method of adding Google Maps to Blogger posts.


To begin, simply visit the Google Maps website and type in the location you wish to display:


For example, if I wanted to display a map of The White House, I would type: "The White House, Washington DC, United States". The search results would then be displayed in a screen like this (click on the image for a larger preview):


If nescessary, we can narrow down the location by clicking one of the links on the left in order to get a more accurate map.


Once we have the map we would like to embed in our Blogger post, we need to retrieve the code required to display it.


To do this, click on the "Link"icon at the top right of the map:


In the pop-up, click "Customize and preview embedded map". This enables us to tweak the dimensions of the map to ensure it fits well within our blog post.


If you are using a default Blogger template, I would advise you to use the "Small" option which will measure 300px in width. This ensures the map will not overlap the space you have available for your blog posts which could mess up the overall layout of your blog.


In cases where you use a widened posts column, you could choose a larger map size or even specify your own dimensions. As a guide, the medium map size is 425px wide while the large embed is 640px. Your selection will automatically generate a new preview which gives a good idea of how well this will fit into your Blogger template design.


Finally, copy all of the code in the third section of this page to your clipboard. We will paste this into our Blogger post shortly.


How to embed the iframe code in your Blogger posts

To add your iframe code to a post, simply crewate a new post and paste the iframe code where you would like your map to appear within the post.


There are no hard and fast rules about how to embed the iframe code in your posts, though I do have some suggestions based on my own experiences:

  • Using Blogger in Draft to write your posts makes the process easier! Just ensure the compose settings are set to "Interpret typed HTML", then you can use either the "Compose" or "Edit HTML" version depending on your personal preferences.

  • If you prefer to use the regular Blogger post editor, ensure you paste the iframe code when using the "Edit HTML" tab, not the rich text composer. Unless you paste the iframe code in the Edit HTML page, your maps will not display properly.

  • It can be easier to write your entire post, then paste the iframe code afterwards, where you would like your map to be displayed. This ensures you don't accidentally delete any of the code when editing, which would render your maps useless.

You should be able to preview how your post will appear after pasting the iframe code into your post, regardless of whether you use Blogger in Draft or the regular post editor, so be sure to check how everything looks before hitting the publish button!


When using Google's simple embedded maps may not be perfect for your needs

Using this simple embed code does not offer complete control over how your maps will appear. If you prefer to use a custom marker or more than one reference point on your maps, you would need a more advanced solution and extensive HTML code.


For a more customized option, I would advise you to check out KabaWeb's Google Maps creator which offers a simple interface for such advanced usage of Google Maps.


Using KabaWeb's Google Maps Creator

KabaWeb's Google Maps Creator allows greater control over how your maps and any information about the locations are displayed. Here for example is a map of 10 Downing Street in London with my choice of marker and a more personalized information bubble:


Using this version of an embedded Google Map is slightly more complicated that using the code generated by Google, though it is most useful to have greater control over the content of your maps.


Generating a Google Maps API key

In order to use the Google Maps Creator, you will need access to your own Google Maps API key, which you can generate from the API sign-up page.


To generate your key, you should accept the terms and conditions for use, then add your blog's URL where prompted. Your API key will be specific to your site, so you cannot use the same key elsewhere. This also means you cannot preview how the maps will appear within your posts (as the URL for preview pages will be different from that where your posts are published).


Once your API key has been generated, copy this long string of numbers and letters to Notepad or your favorite text editor. You will need to access this again soon.


Generating your maps

Once you have your API key saved, you can then generate your maps on the Google Maps Creator page.


Here you can set the following options depending on your requirements:


  • Your map's name

  • The location you wish to display. The preferred format for accuracy seems to be STREET-NAME, TOWN, COUNTRY.

  • Map height and width: the default setting for width is 700px, too wide for most Blogger post sections. Be sure to reduce this to accomodate the settings for your own template

  • Zoom size: unless you prefer to display a town or country view, you can leave the default setting of 14px

  • Map Control: This chooses whether to display controls to the left of the map which visitors can use to zoom in and out

  • Show map types bar: This chooses whether to display the switch to toggle between map, satellite and hybrid views.

  • Show overview inset: This chooses whether to display the inset in the bottom right of the map, which offers a quick overview.

  • Info Text: This is the text displayed in the balloon overlay. You can use plain text or HTML code to style how your informative text will appear.

Once you have changed the settings for your preferences, click the "Generate this map" button, which will update the map preview beneath to show how your embedded map will appear.


Embedding the map in your Blogger post

Once you have generated the map you wish to display, you can use the code provided to paste into your Blogger post (or an HTML/JavaScript widget in your sidebar).


To find the correct code, scroll right down the page until you see the section marked "Portable Code". This is the section of code which is best to use with Blogger powered blogs.


Copy the entire section of code in this box to your clipboard, then switch over to your Blogger post editor.


Be sure you have completely written your blog post before pasting the code for your map, especially if you are using the regular post editor (not Blogger in Draft). When attempting to use this version of an embedded Google Map, I have encountered errors when attempting to edit the post after embedding the code.


If you are using the regular post editor, switch to the Edit HTML tab and paste your code where you would like your map to appear. Then replace "YOURKEY" in the third line with the API key you obtained from the Google Maps developer pages. Then finally, publish your post.


Be sure not to switch back to the "Compose" tab after pasting the code for your map! If you do, the code will become corrupted and your maps will not display properly in the page.


When using Blogger in Draft to compose your posts, it is not necessary to switch to the "Edit HTML" tab. However, it is still advisable to paste the code only after you have finished writing your post, and do not switch between the different post editors.


Once you have published your post, you can take a look at your new maps in your blog posts!


Final thoughts

While Blogger's new Geotagging feature offers an interesting way to add locations to our posts, it is often the case where nothing less than a map will suffice in the understanding of our post content! Using the methods described above, you can easily add interesting and interactive Google Maps to your Blogger posts, ensuring your readers have a deeper understanding of the locations mentioned in your posts.


If you know of other simple methods to add maps to Blogger posts, please feel free to let us know by leaving your comments below.